Managing members
Managing members: menu
Actions related to the member's profile
Other actions
- Making a reservation
- Selling a product
Common problems
The notion of "Member"
Each member of the club has their own profile containing personal information (name, age, gender, etc.). This notion is different from the notion of “Family” or “Company” that was created to group members together. The Families and Companies also have their own properties (more information on the notion of Family/Company).
The member management allows you to see and correct–if you need to–the information concerning all your members. This is a tool you will use all the time. It will help you keep up and get the best of the data you need to manage your club. Obviously, if your database is clean, you will save time on your daily activity.
How can I go to this page?
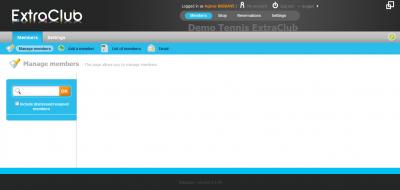
The member management is in the Members Section, under the Members Module and in the “Manage members” menu.
Get to know the main page dedicated to member management
On the left, the search bar allows you to search for a member.
If your club uses the notion of Family/Company, you will see “Member” and “Family/Company” tabs at the top center of the page.
How can I find a member's profile
Searching for a member in the database
 On the left of the screen, you can see a search bar.
You can type in the first letters of the last name (or the complete last name) of the member and click on “OK” or press Enter on your keyboard.
If you enter 4 letters or more, your list of results will be composed of all the names containing the letters you typed, be they at the beginning, in the middle or at the end of the name.
You can also type in the complete last name to narrow your search.
The corresponding list of members will appear below the search bar. It is made up of:
- the families of members whose names match your search (the first name of the head of household appears between brackets)
- the members whose names match your search
Selecting the member
To select a member and display their details, you only need to click on their name in the list.
Please note that if you click on a family, you will get information corresponding to the member's family but you will still be able to view the details of each member by switching between the “Family/Company” tab and the “Member” tab.
Understanding the member's profile
The member's profile is divided into 6 parts:
- General information
- Custom information
- Contact information
- Addresses
- Positive and negative balances
- Shortcuts
General information
This block sums up all the personal information of the member such as their last and first name, birthdate and picture.
If your club uses the directory, there is also a field entitled “Photo can appear in the directory :” where you can specify if the picture can be displayed on the directory and seen by other members.
How can I take a picture?
With ExtraClub, it is very easy to add a picture on your member's profile. You only need to click on the  button. To do so, your computer at the front desk must be equipped with a webcam. As soon as you click on it, the webcam starts and you can take the picture of the member. You can take several pictures and the member can choose the one they like best. Just select the picture and click on “Confirm”.
The Comment field allows you to leave a comment on your member. It will appear on the member's profile and your employees will be able to see it.
The Member type field lets you see what is the current type assigned to the client. You can also view the list of all the types your client has had since he subcribed to your club by clicking on “View the complete history of…”.
Custom information
The “Custom information” part allows you create custom fields containing information that is useful for your daily management. For instance, if you need to know the date when the person arrived at your club, you can create a custom field that will be displayed on the member's profile. You can choose all the parameters: name of field,required field,available to the member or not. You can do anything. For more information with real example, you can visit the page on custom fields.
Once the field has been created, you will only need to fill it in. To do so, edit the member's profile. The custom field will appear on every members' profiles.
Contact information
The “Contact Information” block contains the phone number(s), email address(es) or fax number so you can easily contact them. If you are sending email or newsletters to your members, this is the email address provided here that will be used by ExtraClub.
Addresses
This is where you can provide the address of the member. The contact address will be used by ExtraClub for all the mailing you will send.
Positive and negative balances
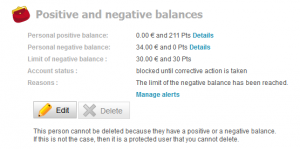
The “Positive and negative balances” block will give you an overview on the balance of your member's account.
The “Personal positive balance” field shows the money and/or units credited by the member.
The “Personal negative balance” field shows the money and/or points owed by the member to the club. The negative balances can be restricted by setting a limit in order to avoid misuse. The negative balance lets you see the debt recorded. It means that that member can no longer use the negative balance as soon as they have reached the limit. For instance, let's imagine that you set the limit at €10. If one of your clients has a negative balance of €9 and wants to buy a drink costing €3, this person will be able to buy this product and to add it to their negative balance because the limit has not already been reached. After this purchase, the negative balance will be €12 even if the limit is 10. Once the debt has been recorded, the account will be blocked and the client will no longer be able to use it until the debt has not been collected.
The “Account status” gives you information related to the status of the account, that is to say if it is blocked or not.
If you click on the “Details” link, you will open a window displaying more information on the member's balance. You will be able to see the history of the latest 50 credit operations (in Euros or units), the latest 50 debts collected or the debts to be collected. You can also find the list of the latest tickets and operations done.
Finally, the “Manage alerts” link allows you to create or manage alert messages. You can select the reason for this alert by choosing the type (empty positive balance, full negative balance, unpaid reservation). You also need to specify the period during which this alert will be valid by filling the “Valid for” field. Lastly, you can also add a comment but this is not required. These alert messages are very useful, for instance, if a member makes many reservations but never comes to play. By adding an alert, you will block their ability to make a reservation for some time (according to the duration you set previously). This function is useful to manage clients who reserve but almost never come or those who do not pay their debts. This is a good way to avoid misuse.
Shortcuts
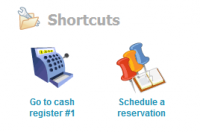
The shortcuts allow you to be quickly redirected to:
- the cash register interface
- the reservation section
With just one click, you can enter a purchase made by the client and link it to their positive or negative balance. You can also make a reservation very easily as the page will already be filled in with the member's information.
Family members
In this part, you will see the names of the family members of the client on ExtraClub. If you click on a name, you will be redirected to the profile of that member.
This page shows you all the information related to the member. If you want to edit this information, click on “Edit”. To help you, we designed a support page dedicated to the edition of a member's profile.
What can I do afterwards?
Once you have found and opened a member's profile, you can:
- edit the profile (add or change the details)
- delete the profile (there may be restrictions)
- make a reservation for the member by clicking on the shortcut
- go to the cash register interface by clicking on the shortcut


