Creating a custom list
Purpose of custom lists
Custom lists are used when you want to create custom fields on your members' profiles. They meet a specific need of your club and can be set up in a few clicks. They will allow you to create combo boxes with multiple choice (or not). Thanks to custom lists, you can filter members and export lists. For instance, you need to know which members are going to the 6pm tennis class on Saturdays. If you have created lists with the corresponding custom fields, it will be very easy to get the list of people who are taking this class.
Where can I find the "Custom lists" menu?
You will find this function in the Members Section, then in the “Settings” module and in the “Custom lists” menu.
Adding a custom list
To create a new list, you only need to click on “Add a list” on the left of your screen. A new window appears:
 The “List name” field invites you to give a name to your list. We recommend you give a precise title because it will appear every time you will be asked to choose one of the list you created. If you have chosen the name carefully, you will know right away what the list is about and you will not have to go back to the custom list management menu to find the list you need. Moreover, it is not possible to change the name of a list. Pay also attention to spelling. You cannot delete lists either.
The “Restrict access” field enables you to choose if your list can be edited by people who a granted specific authorizations on ExtraClub such as a club manager. If you check “No”, everyone having a “back office” access will be able to edit the items of your list.
To help you understand, let's explain with a concrete example. Imagine your club offers Zumba classes lasting one hour and a half every Wednesday and Saturday at 10, 2 and 4:30. We are going to create a list in which we'll group all cases. Let's call this list “Zumba classes”. As for the “Restrict access” field, we can check “No” because employees at the front desk may need to edit the list if one of the classes moves to another time.
 Click on “Confirm”.
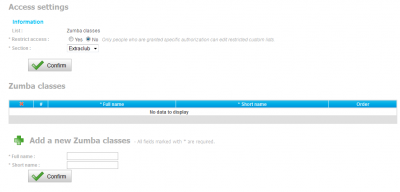
The following screen appears:
 On this screen, you will enter the items that will compose your list. In our example, the items of our list are “Wednesday - 10”, “Wednesday - 2”, etc.
Adding an item to my custom list
In the “Add a new…” (in our example, “Add a type of 'Zumba classes'”), the “Full name” field invites you to enter the name of the first item (here, let's write “Wednesday - 10”).
The “Short name” field allows you to enter a short name that may be useful. In this example, let's enter “Wed - 10”.
Click on “Confirm” to validate your choices. A confirmation message appears, just click on “confirm” again.
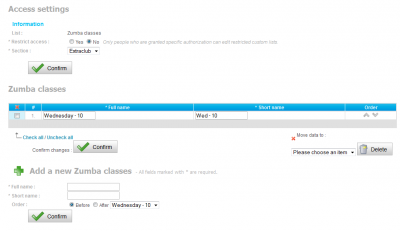
You will see the following screen:
Add as many items as you want by repeating the same procedure.
You can see that the “Order” field appeared under the “Short name” field. Thanks to this, you can choose to put the following item before or after the one you have just created.
Let's add the “Wednesday - 2” item together. We just need to specify “Wednesday - 2” in the “Full name” field and “Wed - 2” in the “Short name” field. Then, you can decide if we want this item to appear before or after the one we have just created. In the “Order” field, let's choose “After” and in the combo box, select “Wednesday - 10”. So, the new item will appear below the first one.
When you have finished adding all the items of your list, here is what we get:

Possible actions on the items of the list
Once your list has been created, you can:
- edit the name of the items in the list
- change the order of the items
- move the information contained in one item into another
Editing the name of an item
To change the name of an item in your custom list, you only need to enter the new name in the box to replace the former one. Don't forget to click on “Confirm”.
Changing the order of the items
Thanks to the small blue arrows on the right of the screen, you can move items up or down in the list. The changes are instantly taken into account. Every time you click on an arrow, the item will go one step up or down in the list. If you want to move the item placed at the top to the fifth place of the list, you will need to click 4 times on the arrow pointing downward. This option can be useful if you have made a mistake and if you need to reorganize a list or if the order is not right.
Moving data to another item
Let's go back to our example. Let's imagine that the class that was taking place on Saturdays at 10 is now cancelled because too few people were attending. However, we ask these people to take the Wednesday morning class instead.
In concrete terms, we are going to move the data of the “Saturday - 10” class to the “Wednesday - 10” class. So, on all the member profiles where the “Zumba classes” field was “Saturday - 10”, the latter will be replaced with “Wednesday - 10”.
As a result, you won't need to change it on each member's profile.
To make the change, select the field you want to “delete” (actually, we are going to move what it contains in another type—which is here “Saturday - 10”) by checking the corresponding box on the left. Then, under the “Move data to”, choose the item into which you want to move the data (here, “Wednesday - 10”). Finally, you just need to click on “Delete”.
A confirmation message appears. Once you have validated, you can see that the “Saturday - 10” field has disappeared. The profiles containing this information have also been changed automatically.

